
The Annotations window is where PDMPublisher stamps get designed: the text, the placeholders that fill it in, the font, the watermark and QR options, the position on the sheet and the sheets it lands on. This article walks the window control by control, using the real editor as it looks when opened on Full_Grill_Assembly.SLDASM. If you want the business case for stamping PDFs, read Watermark and annotate SOLIDWORKS PDF exports first; this page is about the editor itself, in the SOLIDWORKS add-in and the PDM Professional task.
What the window is for
An annotation is a box of text that PDMPublisher draws onto the exported PDF when a publish job runs. The editor lets you define any number of those boxes for one Publish profile (add-in) or one task (PDM Professional). Nothing you do in the window touches the SOLIDWORKS drawing: the canvas is a positioning preview, and adding or moving a box there does not create a SOLIDWORKS note in the source file.
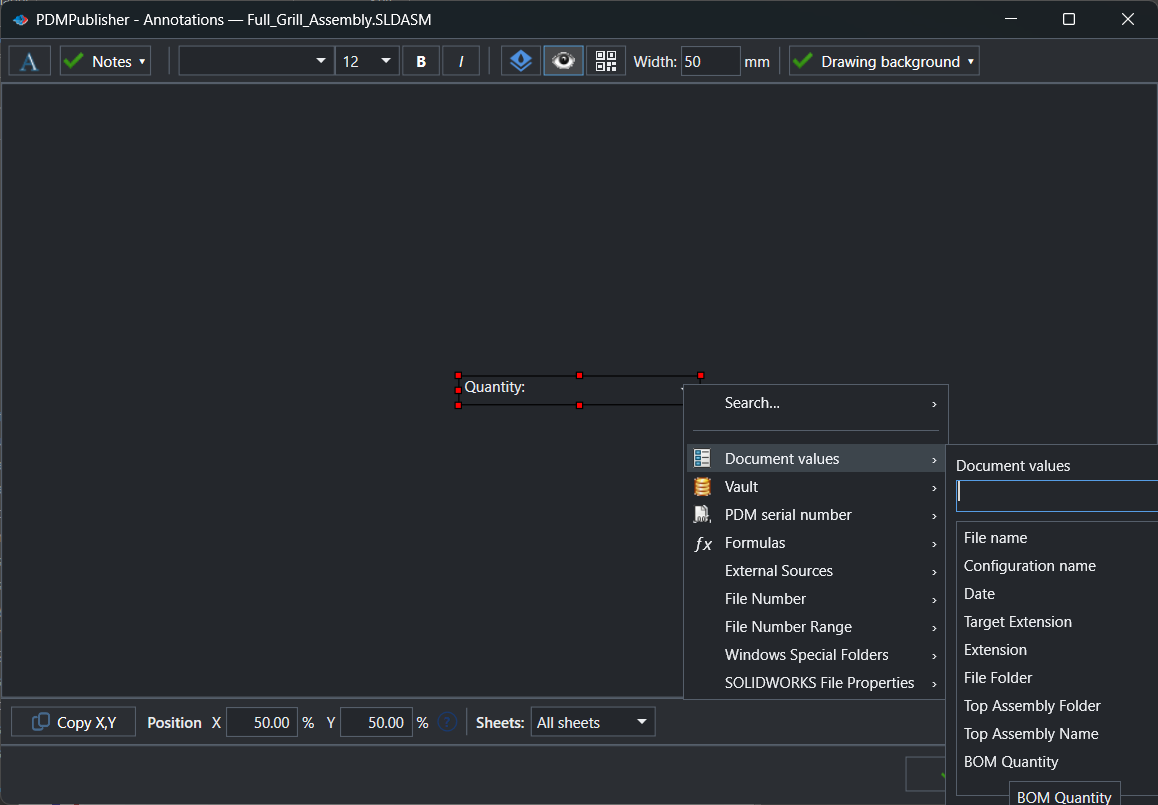
The window title tells you the context. In the screenshot it reads PDMPublisher – Annotations — Full_Grill_Assembly.SLDASM, meaning the value menus are being populated from that active document. Open it on a drawing and the same menus list that drawing’s custom properties instead.
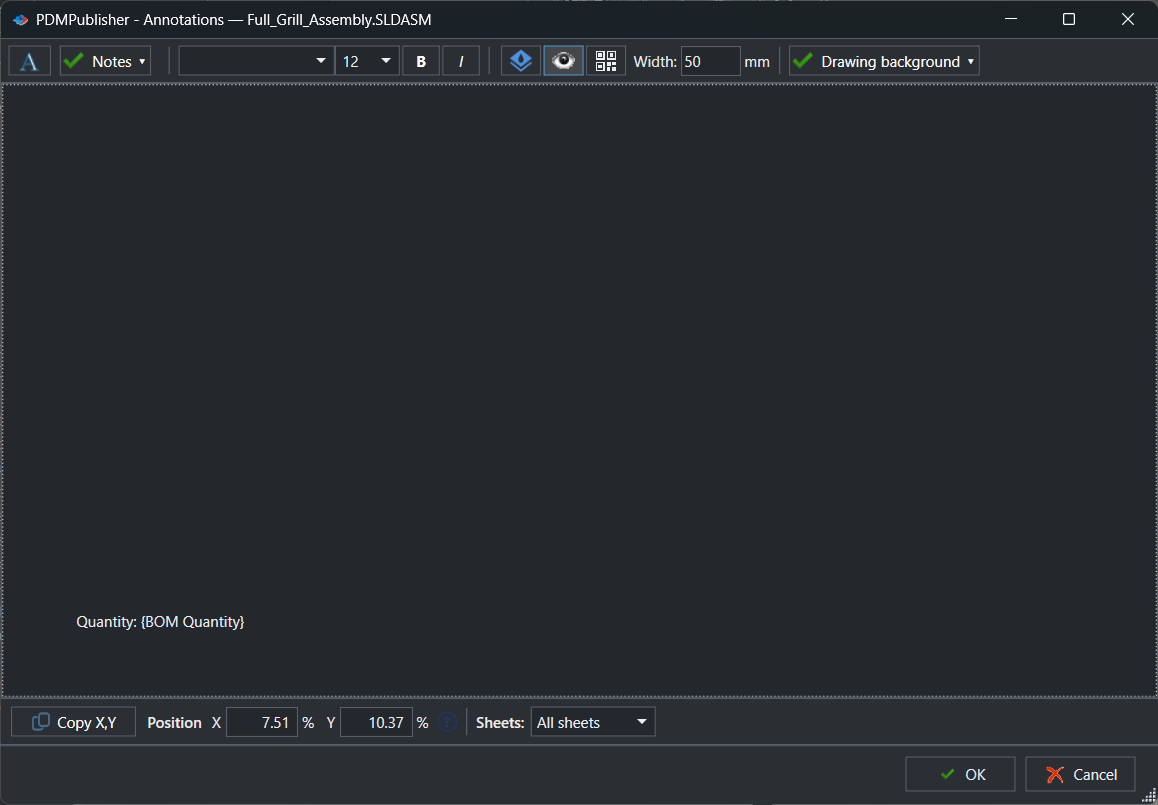
Everything you set here is evaluated later, per document and per configuration, at publish time. A single annotation Quantity: (BOMQuantity) prints a different number on every component drawing of a merged package, because the placeholder is resolved for each file as it is exported.
Why a dedicated editor matters
Stamps in the title block are controlled content: changing them means a check-out and a new version. Stamps added in a PDF viewer after export are manual and vanish on the next republish. The Annotations editor moves the stamp into the publish job, where it is repeatable and driven by live data.
Because the editor belongs to the profile, the profile that decides export location, filename and formats also decides the stamps. A Released profile and a Preliminary profile can share every export option and differ only in their annotation collections; profiles travel by export, import and PIN, so the layout goes with them. See Publishing profiles and company settings.
The toolbar, left to right
The top row holds the content and appearance controls. The screenshot shows, from left: a large A button (Add annotation), a checked dropdown reading Notes (the profile whose annotation collection is being edited), a font family dropdown, a size dropdown showing 12, B and I toggles, a stacked-layers icon, an eye icon, a QR code icon, Width: 50 mm, and a checked Drawing background dropdown.
The font dropdown lists the fonts installed on the computer, alphabetically from 3ds and Adobe Arabic through Arial and onward. The size dropdown offers preset point sizes: 8, 9, 10, 11, 12, 14, 16, 18, 20, 24, 28, 32, 36, 72 and 100. A watermark usually wants 72 or 100; a corner stamp wants 10 to 14.
The stacked-layers icon is the Watermark toggle for the selected annotation. When it is on, PDMPublisher rotates the annotation and renders it semi-transparent so it reads as a stamp across the page instead of hiding drawing content. The eye icon controls how the preview shows annotations; use it together with Show placeholders to see token names instead of evaluated values while you arrange boxes. The QR icon turns the selected annotation into a QR code whose content is the evaluated text, and Width (mm) sets its printed width in millimeters (default 50). Drawing background only affects the preview behind the canvas; it has no effect on the output.
| Control | What it does | Notes / default |
|---|---|---|
| Add annotation (A) | Adds a new annotation box to the profile or task and places it on the canvas. | New boxes are active by default. Use one box per note or watermark. |
| Profile selector (Notes in the screenshot) | Shows which Publish profile’s annotation collection is open. | Add-in only. Use the command arrow on the CommandManager to open a different profile. |
| Font family | Typeface for the selected annotation. | Installed fonts; each annotation has its own. |
| Size | Point size for the selected annotation. | Presets 8 to 100; default 12. |
| B / I | Bold and italic for the selected annotation. | Per annotation. |
| Watermark (layers icon) | Rotates the annotation and makes it semi-transparent. | Off by default. Use for PRELIMINARY, INTERNAL USE, release status. |
| Eye icon / Show placeholders | Controls the preview: placeholder names versus evaluated values. | Preview only. |
| Show annotation (Active) | Includes the annotation in the export. Clear it to keep the definition on standby. | On by default; the state is saved with the profile or task. |
| QR code | Renders the evaluated annotation value as a QR code. | Combine with Width (mm). |
| Width (mm) | Width of the QR code or annotation in millimeters. | Default 50. |
| Drawing background | Background shown behind the canvas for positioning. | Preview only; no effect on output. |
The canvas and the text box
The gray area under the toolbar is the sheet preview. Each annotation is a text box with eight small red handles at its corners and mid-edges; the selected box is highlighted so you know which one the toolbar and bottom row are editing. In the screenshot the box contains Quantity: with the cursor after the colon, ready for a placeholder.
Drag the box to move it and the Position X and Y fields update; type values and the box jumps. Typing directly in the box enters literal content such as PRELIMINARY - NOT FOR PRODUCTION. Positions are stored as percentages, not millimeters, so a box at X 90 / Y 95 lands near the bottom-right corner on an A4 sheet and an ANSI D sheet alike.
The placeholder menu, group by group
Right-click inside a box, or use the value menu, and the placeholder menu opens. The top entry is Search…, a type-to-filter box for long vaults with many variables. Below it, the groups shown in the screenshot are Document values, Vault, PDM serial number, Formulas, External Sources, File Number, File Number Range, Windows Special Folders and SOLIDWORKS File Properties. Each has its own submenu with a search field at the top.
Document values holds the built-in placeholders evaluated from the file being processed: File name, Configuration name, Date, Target Extension, Extension, File Folder, Top Assembly Folder, Top Assembly Name and BOM Quantity. Selecting one inserts the corresponding token, for example (BOMQuantity), into the box at the cursor.
Vault lists PDM data card variables in the ($VariableName) form when the add-in has a local vault view configured under PDMPublisher > Settings > PDM; in the task this is the PDM Variables submenu. PDM serial number exposes serial-number generators from that vault. Formulas lists the named Advanced Formulas and External Sources the named SQL Server sources maintained under Settings; both are covered in External sources and formulas. File Number and File Number Range carry the numeric-filename tokens. Windows Special Folders inserts well-known Windows folder paths, and SOLIDWORKS File Properties lists the custom properties of the active document.
| Menu entry | Token inserted | Example value |
|---|---|---|
| Document values > File name | (FileNameWithoutExtension) | Full_Grill_Assembly |
| Document values > Configuration name | (ConfigurationName) | Full; the @ configuration is written At |
| Document values > Date | (Date) | 9-28-2026 |
| Document values > Target Extension | (TargetExtension) | pdf |
| Document values > Extension | (Extension) | slddrw |
| Document values > File Folder | (FileFolder) | C:\PDMVault\Projects\Grill\Components |
| Document values > Top Assembly Folder | (TopAssemblyFolder) | C:\PDMVault\Projects\Grill |
| Document values > Top Assembly Name | (TopAssemblyName) | Full_Grill_Assembly |
| Document values > BOM Quantity | (BOMQuantity) | 4 |
| Vault > variable | ($VariableName) | ($Description) → Grill body |
| File Number > first N digits | (FileNameNumberFirst4Digits) | 1234 for PART-123456-A |
| File Number Range > range | (FileNameNumberRange) | 11000-11999 for 11345 |
| SOLIDWORKS File Properties > property | The active document’s custom property | Revision → B |
Worked examples.
Quantity: (BOMQuantity)becomesQuantity: 4on a component drawing whose reference count in the top assembly is 4.(TopAssemblyName) - (ConfigurationName) - (Date)becomesFull_Grill_Assembly - Full - 9-28-2026.Exported as (TargetExtension) from (Extension)becomesExported as pdf from slddrw. Placeholders that resolve to empty contribute nothing, so avoid trailing separators after optional values such as(Revision).
The bottom row: Copy X,Y, Position and Sheets
Under the canvas sit the placement controls. Copy X,Y reads the position of a note selected in the SOLIDWORKS drawing and writes it into the X and Y fields, so an annotation can sit exactly where an existing title-block note sits. Position X and Y show 50.00 % each on a new box, the sheet center; X runs across the width, Y down the height. A small help icon beside Y explains the convention.
Sheets offers All sheets, First sheet and These sheets; the last reveals a field for sheet names separated by comma, for example Sheet1, Flat Pattern. Every annotation carries its own rule, which is how a cover-sheet release stamp and an every-sheet watermark share one profile. OK writes the collection to the profile or task; Cancel discards everything changed since the window opened.
| Control | What it does | Notes / default |
|---|---|---|
| Copy X,Y | Copies the selected SOLIDWORKS drawing note’s position into X and Y. | Add-in; a note must be selected in the open drawing. |
| Position X (%) | Horizontal position as a percentage of sheet width. | Default 50.00. |
| Position Y (%) | Vertical position as a percentage of sheet height. | Default 50.00. |
| Sheets | Which sheets get this annotation. | All sheets (default), First sheet, These sheets. |
| Names separated by comma | Sheet names for a These sheets rule. | Appears only when These sheets is chosen. |
| Import… / Export… | Loads or saves the whole annotation collection as an .edmtdf file. | Import replaces the collection shown for the selected profile. |
| OK / Cancel | Saves to the profile or task, or closes without saving. | Changes are kept only after OK. |
How annotations are applied on export
- The publish job exports each source document and configuration to the selected formats. Annotations apply to PDF output, so
pdfmust be among the profile’s or task’s File Formats. - For each exported PDF, PDMPublisher takes every annotation whose Show annotation (Active) flag is on.
- Each annotation’s text is evaluated for that document and configuration: built-in tokens, vault variables, formulas, external-source values and SOLIDWORKS properties are replaced with their current values. An empty value contributes an empty string.
- The text is drawn at the stored X/Y percentage, in the stored font, size, bold and italic, rotated and faded if Watermark is on, or encoded as a QR code of the stored width if QR code is on.
- The Sheets rule decides which pages receive it: every page, the first page, or the pages whose sheet names are listed.
- The job continues with PDF merging, bookmarks, table of contents and archiving as the profile dictates. Merged packages therefore contain each component’s own evaluated stamp.
The order matters for one common question: a merged master PDF is assembled from already-annotated per-document PDFs, so
(BOMQuantity)and(FileNameWithoutExtension)vary page by page inside the merge, while a stamp using(TopAssemblyName)reads the same on every page.
Import and export the collection
Export… writes the collection to an .edmtdf file with every annotation’s text, formatting, placement, sheet selection and active state. Import… loads such a file into the profile currently selected, which is the quick way to copy a layout into a second profile or hand it to a colleague.
Importing replaces the collection currently shown for the selected profile, so export the existing set first. The .edmtdf format is kept for compatibility with older exports and PDM task definitions; exchange new add-in configurations as Publish profiles or complete settings bundles from PDMPublisher > Settings, which also carry Options and Conditions.
Set it up in the SOLIDWORKS add-in
- Open the drawing, part or assembly in SOLIDWORKS. The window title and the value menus follow this active document.
- On the PDMPublisher CommandManager tab select Annotations. Use the command arrow to open the annotation collection of a specific Publish profile; the profile name appears in the toolbar dropdown.
- Select Add annotation. A red-handled box appears at X 50 / Y 50.
- Type literal text, then open the placeholder menu and insert tokens from Document values, Vault, Formulas, External Sources or SOLIDWORKS File Properties. Use Search… when the list is long.
- Set font, size, B and I. Toggle Watermark for a rotated stamp or QR code plus Width (mm) for a scannable code.
- Drag the box or type Position X / Y. To align with an existing note, select it in the drawing and use Copy X,Y.
- Choose Sheets. For These sheets, enter names separated by comma.
- Repeat for each stamp. Clear Show annotation on any definition you want to keep but not publish.
- Select OK, then run PDMPublisher > Publish with the same profile and
PDFin File formats. Verify in Publishing results; see Publishing results and logs.
Set it up in the PDM Professional task
- In the SOLIDWORKS PDM Administration tool, open the PDMPublisher task under Tasks, or create one with New Task… and select PDMPublisher on the Add-in page.
- On the Options page confirm
pdfis selected in File Formats. - Open the Annotations page. The same editor appears, with the annotation table listing the task’s annotations.
- Select Add Annotation, enter the Annotation Text and insert PDM variables from the menu. For database values add a SQL value and edit its query with the
($SQL-Filename),($SQL-Part),($SQL-Assembly)or($SQL-Drawing)placeholders. - Apply Text Formatting, enable Watermark where wanted, set Position and choose Sheets.
- Leave Active on for annotations that should print. Click OK to save the task, then attach it to a workflow transition, run it from the right-click Tasks menu or schedule it.
Differences between the add-in and the task
| Aspect | SOLIDWORKS add-in | PDM Professional task |
|---|---|---|
| Where the collection is stored | Selected Publish profile | Task definition |
| Source of values | Active document and its resolved references; SOLIDWORKS custom properties; vault values when a local vault is configured | PDM variables and vault task context |
| Placeholder menu groups | Document values, Vault, PDM serial number, Formulas, External Sources, File Number, File Number Range, Windows Special Folders, SOLIDWORKS File Properties | Built-in placeholders and PDM Variables submenu |
| Copy X,Y | Available; reads a selected drawing note | Not applicable |
| Import / Export | .edmtdf per profile | Stored with the task; .edmtdf kept for compatibility |
| Licensing | Included in the free Community Edition and Premium | Licensed per vault; 7-day trial |
Recipes
- Per-component quantity note. Text
Quantity: (BOMQuantity), size 14, bold, X 90 / Y 95, All sheets. Publish the assembly with references exported individually and merged PDFs; every component page shows its own count. - Configuration label. Text
Config (ConfigurationName) of (TopAssemblyName), size 12, X 50 / Y 3, First sheet. Pair it with Convert Multiple Configurations so each configuration’s PDF is self-identifying. - Two profiles, one drawing. Profile Preliminary:
PRELIMINARY - NOT FOR PRODUCTION, size 100, Watermark on, All sheets. Profile Released: no watermark, aReleased (Date)stamp on the First sheet. Pick the profile from the Publish command arrow.
Tips, limits and troubleshooting
- The box shows a token, not a value. That is the Show placeholders preview mode. Values are only resolved at publish time; check the PDF or the Detailed log for the evaluated text.
- A menu group is empty. Vault and PDM serial number need a local vault view selected under PDMPublisher > Settings > PDM; Formulas and External Sources list only what has been defined under Settings; SOLIDWORKS File Properties lists the active document’s properties, so open the right document first.
- Nothing prints. Confirm Show annotation is on,
PDFis among the formats, and the Sheets rule names sheets that exist in the drawing. - Position differs across sheet sizes. X and Y are percentages; mixed sheet sizes place the stamp proportionally. Use separate annotations with These sheets rules when specific sheets need different offsets.
- Import wiped my annotations. Import replaces the collection for the selected profile. Restore from your
.edmtdfor profile export. - External-source value is empty. A working connection does not guarantee a row for every filename. Test the source with a real filename under Settings > External Sources > Edit / Test. Credentials are not exported or shared by PIN; re-enter them after import.
- Community Edition. Annotations are fully available in the free add-in; Community limits apply to formats (PDF, DXF, STEP) and to 5 references per run.
Availability
Available in PDMPublisher for SOLIDWORKS (the add-in) and PDMPublisher for PDM Professional (the task). The Annotations editor is shared by the SOLIDWORKS add-in and the PDM Professional task. The add-in reads document values from the active SOLIDWORKS document and stores the collection in the selected Publish profile; the task lists PDM variables from the vault and stores the collection in the task definition.
Documentation and related features
- Publishing Annotations in the SOLIDWORKS add-in
- Add Annotation (task and add-in reference)
- Watermark your PDFs
- Conditional assembly processing
- Publishing profiles and company settings
- External sources and formulas
- SOLIDWORKS drawing documents
Frequently asked questions
Where is the Annotations editor in PDMPublisher?
In SOLIDWORKS, on the PDMPublisher CommandManager tab select Annotations; the command arrow opens a specific Publish profile. In the PDM Professional task it is the Annotations page of the task in the PDM Administration tool.
What placeholders can I insert into an annotation?
The menu groups are Search, Document values (File name, Configuration name, Date, Target Extension, Extension, File Folder, Top Assembly Folder, Top Assembly Name, BOM Quantity), Vault, PDM serial number, Formulas, External Sources, File Number, File Number Range, Windows Special Folders and SOLIDWORKS File Properties.
What do Position X and Y mean in the Annotations editor?
Percentages of the sheet width and height. 50 / 50 is the sheet center. Drag the box or type values; Copy X,Y takes the position of a note selected in the SOLIDWORKS drawing.
Does the Annotations editor change my SOLIDWORKS drawing?
No. The canvas is a positioning preview. Annotations are drawn on the exported PDF at publish time; the source drawing is never modified.
How do I put an annotation on only some sheets?
Set the annotation’s Sheets rule to First sheet, or to These sheets and list the sheet names separated by comma. Each annotation has its own rule.
Can I copy annotations from one profile to another?
Yes. Use Export… to save the collection as an .edmtdf file, select the other profile and use Import…. Import replaces that profile’s current annotations.