
The bill of materials is where design meets purchasing, and it is usually built twice: once by SOLIDWORKS in a drawing table and once by hand in Excel because the table cannot be grouped, filtered or fixed without editing every part. BOM Manager in PDMPublisher for SOLIDWORKS reads the active assembly into a live grid with the columns you choose, groups and excludes rows by condition, round-trips the data through Excel with your own workbook template, and applies supported property edits back to the models.
What BOM Manager does
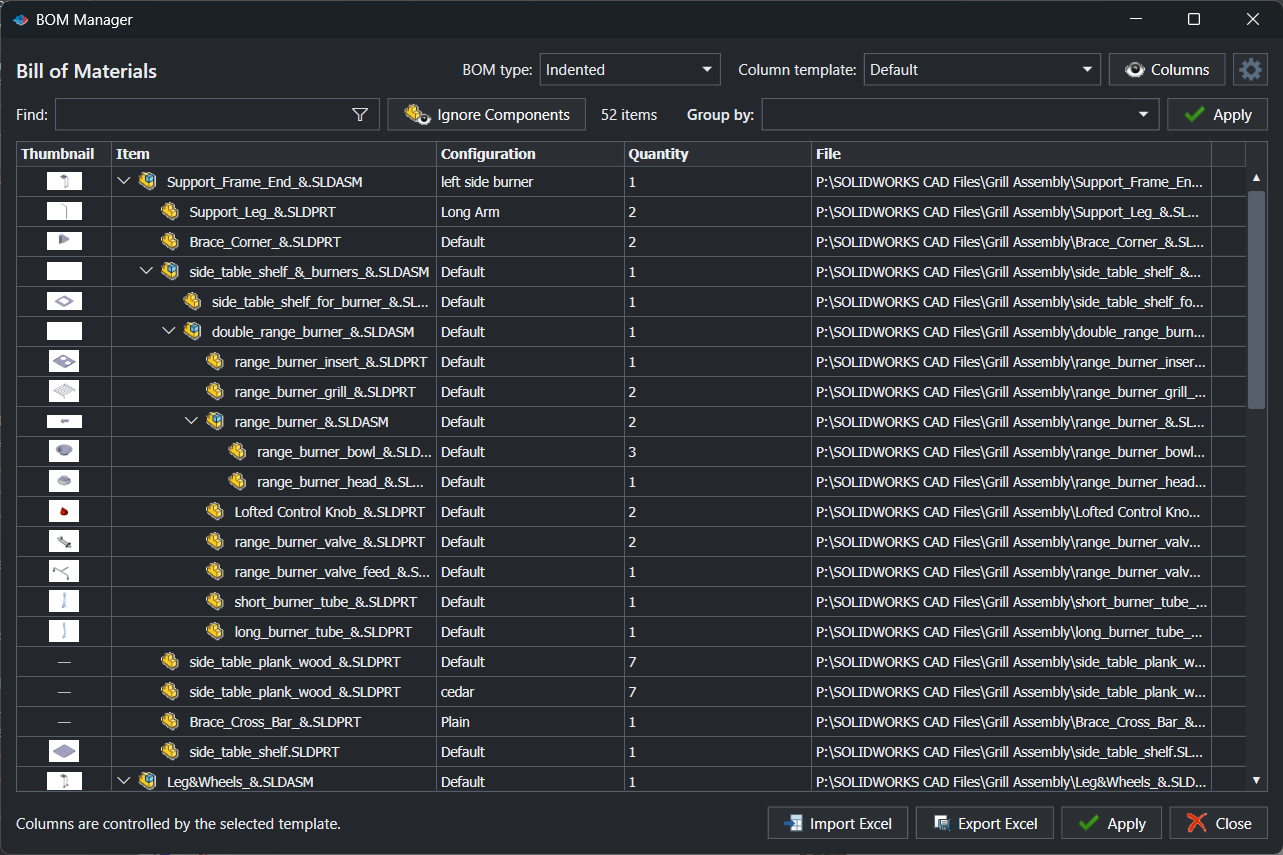
BOM Manager opens the active assembly as a bill of materials. The grid shows the assembly hierarchy with each row’s configuration, quantity and the property columns of the selected column template. You choose the SOLIDWORKS BOM structure (Indented, Parts only or Top-level only), find and filter rows, group them by an expression, exclude components that match conditions, edit supported values, and import or export Excel.
The same column templates, display type, grouping expression and exclusion conditions form the defaults that other PDMPublisher BOM workflows start from. ERP Sync reuses BOM Manager column templates to decide which values a connector can map, although its own view settings are kept separately.
Why it matters
Purchasing needs a flat parts list with quantities rolled up; production needs the indented structure; the customer needs neither the fasteners nor the phantom subassemblies. Building each of these by hand from a drawing table is slow and the results disagree. BOM Manager produces each view from the same assembly in seconds, and the exclusion rules mean that hardware or reference geometry disappears from the BOM without being suppressed or deleted in SOLIDWORKS.
The Excel round trip closes the loop. Export with a workbook template that carries your logo and headings, let the buyer or the checker correct descriptions in Excel, import the workbook back and Apply the supported changes to the models. The properties that title blocks, PDM data cards and ERP items depend on stay in the SOLIDWORKS files, not in a spreadsheet nobody can find.
How it works, step by step
- Open and activate an assembly in SOLIDWORKS and select PDMPublisher > BOM Manager from the CommandManager or Tools > PDMPublisher. The command requires an active assembly.
- The window opens with the Default BOM display type and Default column template from Settings. Change BOM type or Column template at the top to switch the view, and use Columns to adjust which properties are shown.
- Type in Find to narrow the rows; the item counter beside Ignore Components reports how many rows remain.
- Enter a Group by expression, inserting document values from its placeholder menu, to collapse rows under a shared key such as material or supplier. Leave it empty for a flat, ungrouped result.
- Select Ignore Components to define conditions that remove matching components from the BOM.
- Edit supported cells directly, or select Export Excel, work in the workbook, and Import Excel to load the corrections.
- Select Apply to write the supported changes to the SOLIDWORKS documents, then save them.
Every control in the BOM Manager window
| Control | What it does | Notes |
|---|---|---|
| BOM type | Switches the SOLIDWORKS BOM structure: Indented, Parts only or Top-level only. | Indented shows the hierarchy with expandable subassemblies. |
| Column template | Selects the saved set and order of property columns, for example Engineering. | Columns are controlled by the selected template. |
| Columns | Shows or hides property columns for the current view. | |
| Gear button | Opens the persistent BOM Manager settings. | Same page as Settings > BOM Manager. |
| Find | Filters rows by text. | The counter shows the number of items displayed. |
| Ignore Components | Opens the condition editor that omits matching components. | Affects BOM membership only. |
| Group by | Groups rows by text, properties or placeholders. | Empty means a flat list. |
| Apply (top and bottom) | Writes supported changes back to the assembly documents. | Community Edition displays and exports up to 10 rows. |
| Import Excel | Loads a workbook previously exported from BOM Manager. | Rows are matched through hidden import identifiers written on export. |
| Export Excel | Writes the current BOM to a workbook, optionally from your template and with thumbnails. | |
| Close | Closes the window. | |
| Grid columns Item, Configuration, Quantity | Built-in columns: filename with type icon, the configuration used, and the rolled-up quantity. | Property columns follow, each with a filter arrow. |
Settings page: every default
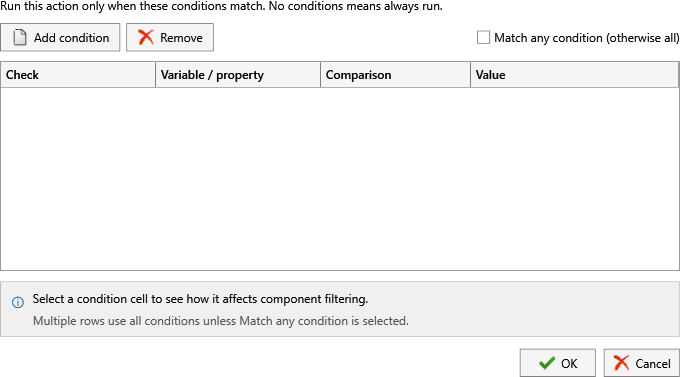
Open PDMPublisher > Settings > BOM Manager under Bill Of Materials, or select the gear in the window. OK saves, Reset restores the page defaults.
| Setting | What it does | Notes / default |
|---|---|---|
| Default column template | Selects the saved set and order of BOM columns used when the window opens. | Default template named Default. |
| Default BOM display type | Selects the SOLIDWORKS BOM structure: Indented, Parts only or Top-level only. | Indented by default. |
| Group by | Text and placeholders that group rows. | Leave empty to show a flat list. Use the dropdown to insert document values. |
| Ignore Components | Opens the condition editor used to omit matching components from the BOM. | The page reports how many conditions are defined and whether all or any must match. |
| Workbook template (.xlsx or .xltx) | Optional Excel template for exports. Enter the path or select Browse…. | Leave blank for the standard layout. |
| Include thumbnail | Includes the available model thumbnail in the exported workbook. | On by default. |
Ignore Components: condition-based exclusions
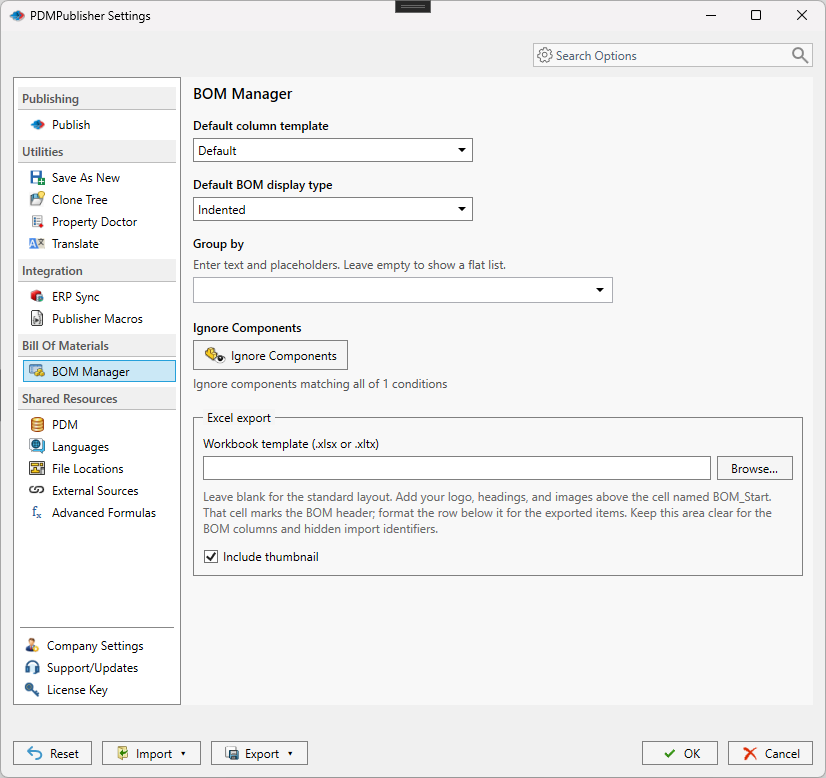
Ignore Components opens a condition editor. Each row has a Check box, a Variable / property, a Comparison and a Value. Use Add condition and Remove to maintain the list. By default a component is ignored only when all conditions match; enable Match any condition (otherwise all) to ignore it when any condition matches. No conditions means nothing is excluded.
Exclusions change BOM membership only. Matching components are neither suppressed nor deleted in the SOLIDWORKS assembly, and the drawing table is untouched. Select a condition cell to see how it affects component filtering.
Group by and placeholders
The Group by field accepts literal text combined with document values inserted from its placeholder menu. The value is evaluated for each row and rows sharing the same result are collected under one group header. The menu lists the document and property values available for the assembly components; pick from it rather than typing so the names are correct.
{Material}: one group per material, convenient for a cutting list or a raw-material order.{Supplier} - {Category}: groups by supplier, then by a category property, for split purchase orders.- Empty: flat list, which is also what a BOM Push in ERP Sync requires.
Excel export and import with a workbook template
Export Excel writes the displayed rows to a workbook. With Workbook template blank you get the standard layout. With a template, PDMPublisher writes the BOM into your file: add your logo, headings and images above the cell named BOM_Start; that cell marks the BOM header, and the row below it is formatted for the exported items. Keep the area under it clear because the BOM columns and hidden import identifiers are written there.
Include thumbnail adds the model preview to each exported row. Import Excel reads a workbook that was exported by BOM Manager, uses the hidden identifiers to match rows, and loads the changed values into the grid, where Apply writes the supported ones to the documents.
Use an
.xltxtemplate when the file should never be overwritten by an export; use.xlsxwhen the template itself evolves with the company standard.
Works with SOLIDWORKS PDM
BOM Manager reads the assembly loaded in SOLIDWORKS, so the values it shows are the ones in the local files; get latest in PDM before opening it if the BOM must reflect the vault. Property changes written by Apply require the documents to be writable, which in a vault means checked out; check them in afterwards so the data card variables mapped to those properties update. Placeholder menus can include PDM values when a vault is selected under Settings > PDM.
Set it up in the SOLIDWORKS add-in
- Open PDMPublisher > Settings > BOM Manager.
- Select the Default column template. Create or edit templates so that the columns match the properties your BOM consumers need (PartNumber, Description, Material, Revision, Supplier and so on).
- Select the Default BOM display type for the way you usually work: Indented for structure, Parts only for purchasing.
- Enter a Group by expression if rows should be grouped by default, using the placeholder menu.
- Select Ignore Components, add conditions such as a property equal to Hardware, choose all or any, and OK.
- Enter or Browse… to a Workbook template and decide on Include thumbnail.
- Select OK. Open an assembly and select BOM Manager; the window opens with these defaults.
- Share the templates and defaults with Export at the bottom of Settings (file or six-digit PIN) so the whole team produces identical BOMs.
Recipes
| Scenario | Settings | Result |
|---|---|---|
| Purchasing parts list | BOM type Parts only; template Purchasing with PartNumber, Description, Supplier, Quantity; Ignore Components: Category equals Reference; Export Excel with the company workbook template. | A branded, flat parts list with rolled-up quantities and no reference geometry. |
| Raw material summary | BOM type Parts only; Group by {Material}; template with Material, Description, Quantity. | Rows collected per material for the stock order. |
| Description review by the checker | Export Excel with thumbnails; checker edits Description cells; Import Excel; Apply. | Corrected descriptions written back into the part files, ready for drawings and ERP Sync. |
Tips, limits and troubleshooting
- Community vs Premium. Community Edition displays and exports up to 10 rows; Premium has no row limit. Limits apply per operation and never expire.
- Command is disabled. BOM Manager requires an active assembly; open the assembly document, not its drawing.
- Rows are missing. Check the Ignore Components conditions, the Find filter and the BOM type. Exclusions never change the SOLIDWORKS assembly itself.
- Import does nothing. Only workbooks exported by BOM Manager can be imported; the hidden identifiers under
BOM_Startmust be intact. - Template layout broke. Keep the area below
BOM_Startempty and format only the single row beneath it. - Apply skipped some cells. Only supported edits are written; built-in columns such as Item, Configuration and Quantity and read-only documents are not changed. Save the documents afterwards.
- ERP Sync shows different columns. ERP Sync has its own default template, display type, grouping and exclusions under Settings > ERP Sync; it borrows BOM Manager column templates but not the BOM Manager defaults.
- Logs. Open PDMPublisher > Logs, Save… the session log right after the problem and include it when contacting support.
Availability
Available in PDMPublisher for SOLIDWORKS, the add-in that runs inside SOLIDWORKS. Not part of the PDM Professional task. BOM Manager is a command of the PDMPublisher for SOLIDWORKS add-in and requires an active assembly. It is not part of the PDM Professional task.
Documentation and related features
- BOM Manager
- ERP Sync
- Property Doctor
- Conditional assembly processing
- SOLIDWORKS assembly documents
- Clone Tree
- Publishing profiles and Company Settings
Frequently asked questions
Which BOM types does BOM Manager support?
Indented, Parts only and Top-level only, selected in the window or as the Default BOM display type in Settings.
Can I exclude fasteners or reference parts from the BOM without suppressing them?
Yes. Ignore Components defines property conditions; matching components are removed from the BOM membership only and stay untouched in the SOLIDWORKS assembly.
Can I export the BOM to my own Excel template?
Yes. Set Workbook template to an .xlsx or .xltx file with a cell named BOM_Start where the header goes; logo and headings go above it. Include thumbnail adds model previews.
Can edits made in Excel be written back to the parts?
Export Excel, edit the workbook, Import Excel, then Apply. Supported changes are written to the SOLIDWORKS documents; save them afterwards.
How do I group the BOM by material or supplier?
Enter a Group by expression such as {Material} using the placeholder menu. Leave it empty for a flat list.
How many rows does the Community Edition show?
Community displays and exports up to 10 rows. Premium removes the limit.