
SOLIDWORKS runs on the Parasolid kernel, so Parasolid is the most faithful file you can send to another Parasolid application such as NX, Onshape or Solid Edge. PDMPublisher writes one X_T (or X_B) per part, configuration and body in one run, in SOLIDWORKS or as a PDM Professional task.
Quick answer
- Open the part, tick Parasolid Text (x_t) under File formats on the PDMPublisher tab, set a filename such as
(FileNameWithoutExtension)-(Revision), select Publish. - Tick Convert multiple configurations and put
(ConfigurationName)in the filename to get every configuration, not just the active one. - Parasolid Text needs Premium in the add-in (the free Community Edition does PDF, DXF and STEP). The PDM task includes every format.
In SOLIDWORKS: step by step
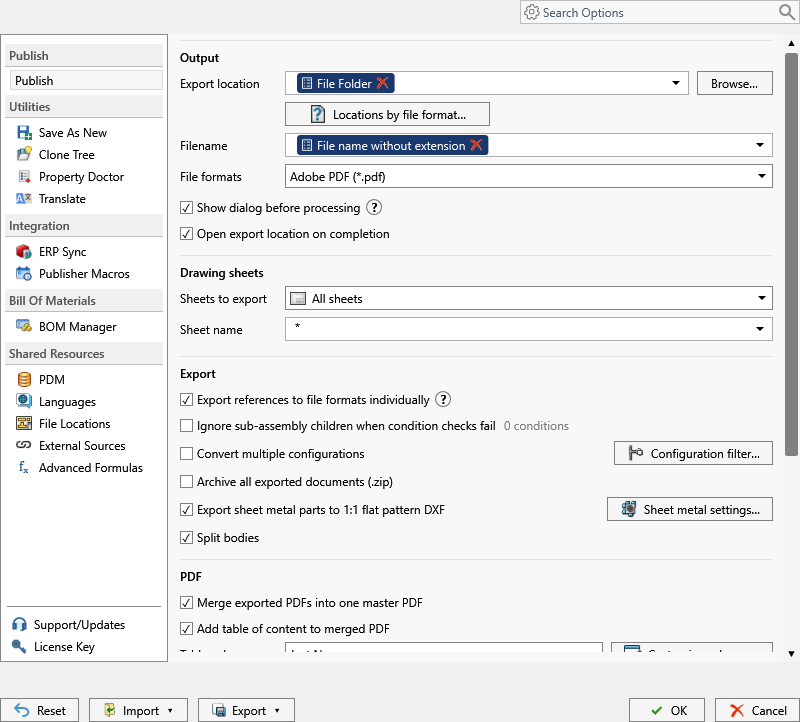
- Open the part (or an assembly if you want all its parts).
- On the PDMPublisher tab, select Settings > Publish.
- Set Export location and Filename, for example
(FileNameWithoutExtension)-(Revision). The.x_textension is added for you. - Under File formats, tick Parasolid Text (x_t). Tick Parasolid Binary (x_b) too if the receiving system prefers the smaller binary file.
- For every configuration, tick Convert multiple configurations and add
(ConfigurationName)to the filename. Use the Configuration Filter to includePROD*or exclude*Flat*. - For one file per body, tick Split bodies.
- Select PDMPublisher > Publish, confirm the review dialog, and check Publishing results.
As a PDM task: on every release
PDMPublisher for PDM Professional runs the same engine as a task, so the export happens when the file changes state, not when somebody remembers.
- In PDM Administration, right-click Tasks > New Task, choose PDMPublisher, name it and tick the task hosts.
- On the Options page set Export Location, for example
(VaultRootFolder)\Exports\PARASOLID(no trailing backslash), and the Filename. - Tick Parasolid Text (x_t) under File Formats.
- Enable Convert multiple configurations and Split bodies as needed, with
(ConfigurationName)in the filename. - For release workflows, enable Get latest revision only, then attach the task to a workflow transition.
Settings that matter
| Setting | What to put | Why |
|---|---|---|
| Filename | (FileNameWithoutExtension)-(ConfigurationName) | Configurations do not overwrite each other. |
| Configuration Filter | PROD* to include, *Flat* to exclude | Only the variants the receiver should see. |
| Split bodies | On for multi-body parts | One file per body, body name appended. |
| Export location | (VaultRootFolder)\Exports\PARASOLID, no trailing backslash | Created if missing; you need add and edit permission there. |
Naming examples
(FileNameWithoutExtension)-(Revision)givesBracket-B.x_t.(FileNameWithoutExtension)-(ConfigurationName)givesBracket-Default.x_tandBracket-Machined.x_t.(VaultRootFolder)\Supplier Packages\($ProjectNumber)\(TargetExtension)in the task files each format in its own subfolder per project.
Customize Location (Premium in the add-in, standard in the task) gives each format its own folder from one job.
If something looks wrong
- Weldment bodies came out as Body1, Body2: rename the bodies in the FeatureManager before publishing; Split bodies uses those names.
- Only the active configuration came out: Convert multiple configurations is off, or the filename has no
(ConfigurationName). - Parasolid Text is missing from the results: the add-in is running as Community Edition. Activate a Premium key under PDMPublisher > License Key, or use the PDM task.
- The file imports oddly on the other side: PDMPublisher has no Parasolid Text sub-options. SOLIDWORKS export settings under Tools > Options > Export apply where the job runs.
- Nothing in the folder: you need add and edit permission in the export location. Target a subfolder, not the vault root.
Keep going
Documentation
Frequently asked questions
What is the difference between X_T and X_B when exporting from SOLIDWORKS?
X_T is Parasolid Text, X_B is Parasolid Binary. Same geometry; text is more widely accepted, binary is smaller, and PDMPublisher can write both in one job.
Can I convert every configuration of a part to Parasolid in one go?
Yes. Enable Convert multiple configurations and put (ConfigurationName) in the filename.
How do I get one Parasolid file per body of a multi-body part?
Tick Split bodies. Each body goes to its own file with the body name appended.
Can PDM Professional export Parasolid automatically on release?
Yes. A PDMPublisher task with x_t or x_b ticked can run on a workflow transition, from the right-click menu or on a schedule.