
Converting SLDPRT to STEP is the most common export request in a SOLIDWORKS shop. Suppliers quote from it, machinists program from it, and customers on other CAD systems can only open it. PDMPublisher makes it one click in SOLIDWORKS, or a workflow transition in SOLIDWORKS PDM Professional, and writes a correctly named STEP for every part, configuration and body you pick.
What you get
STEP (step) is the neutral 3D format nearly every CAD, CAM and inspection tool reads. It carries solid geometry without SOLIDWORKS features: the supplier gets the shape, not how you modeled it.
You get one .step per part, per configuration with Convert multiple configurations, and per body with Split bodies (body name appended). The filename follows your pattern: Bracket-B-Machined.step, not Bracket.step overwritten three times. SOLIDWORKS’ current STEP export options (AP version and so on) apply.
The manual way, and why it doesn’t scale
Open the part, go to File > Save As, pick STEP AP214, set folder and name, save. Repeat for every configuration, and again for every body you want as its own file.
Fine for one part. For forty, or a supplier package redone at every revision, it’s an afternoon of clicking and badly named files. Configurations are the usual trap: forget one and the supplier quotes the wrong size.
Convert SLDPRT to STEP with the add-in
- Open the part in SOLIDWORKS, saved, references resolved. An assembly works too if you want its parts.
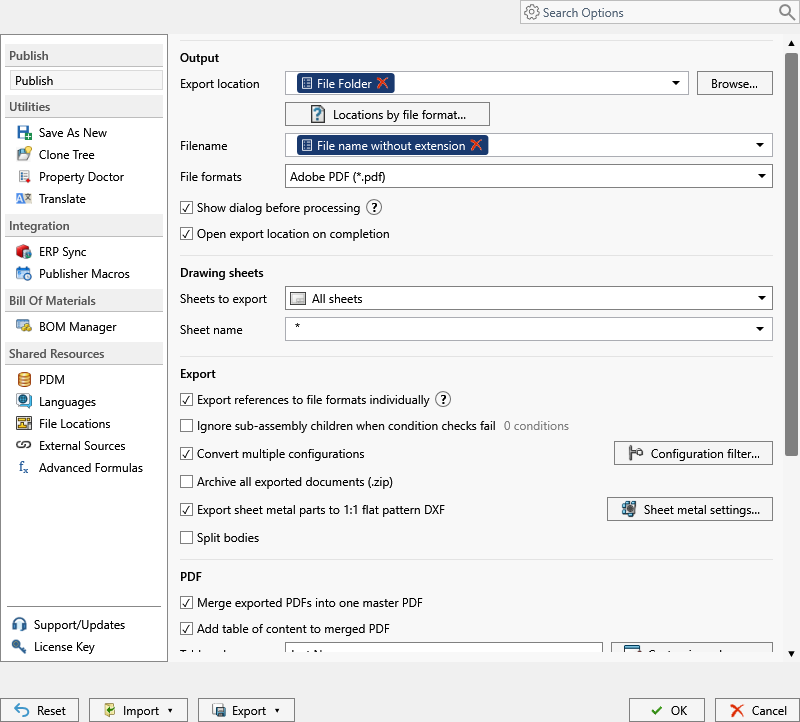
- On the PDMPublisher tab, select Settings, then Publish.
- Set Export location: a fixed folder, UNC path, relative folder, or placeholders from the
>...menu. - Set the Filename pattern, such as
(FileNameWithoutExtension)-(Revision); the.stepextension is added for you. - Under File formats, tick STEP (
step). Other ticked formats come out in the same pass. - Tick Convert multiple configurations and put
(ConfigurationName)in the filename so configurations don’t overwrite each other. The Configuration Filter includes (PROD*) or excludes (*Flat*) by wildcard. - Tick Split bodies for one file per body, body name appended.
- Select
PDMPublisher > Publish; the arrow beside it runs a named profile at once. Confirm the review dialog if it appears. - Open Publishing results to see every file, its configuration and destination.
STEP is a Community Edition format of the add-in (with PDF and DXF), limited to 5 references per run. Premium removes the limit and adds per-format export locations.
Automate it as a PDM task
PDMPublisher for PDM Professional runs the same engine as a task, so parts become STEP when they change state.
- In PDM Administration, right-click Tasks, select New Task, choose PDMPublisher and name it; users see that name in the right-click menu.
- On the Options page, set Export Location and Filename.
(VaultRootFolder)\Exports\STEPkeeps output in the vault, a UNC path keeps it outside; no trailing backslash. - Under File Formats, tick STEP (
step). - Enable Convert multiple configurations and the Configuration Filter as in the add-in, with
(ConfigurationName)in the filename. - Enable Split bodies for multi-body parts.
- Pick Use this version of SOLIDWORKS: an installed year on the host, or
Latest. For release workflows, enable Get latest revision only too; it exports the revised version, not work in progress. - Attach the task to a workflow transition, leave it in the right-click menu, or run it from Scheduled Items.
A task run on an assembly needs Template set to a PDM BOM layout with name, configuration and quantity columns, and Export references to file formats individually enabled. A single part needs neither.
Settings that matter for STEP
| Setting | What it does | Tip |
|---|---|---|
| Export location | Output folder: vault, relative, UNC or outside. Created if missing. | (TopAssemblyFolder)\Exports\(Revision) works; no trailing backslash. |
| Filename | Static text, placeholders, custom properties or PDM variables. | (ConfigurationName) for configurations, (Revision) for released files. |
| File formats | Tick STEP (step); invalid formats are dropped. | Several formats per job. |
| Convert multiple configurations | Every configuration, not just the active one. | Needs a configuration-specific filename. |
| Configuration Filter | Include or exclude by name or wildcard. | Exclude *Flat* to skip flat patterns. |
| Split bodies | One file per body, name appended. | Flat pattern DXF has its own per-body option. |
| Customize Location | Per-format folders overriding the main one. | Premium in the add-in. |
| Get latest revision only (task) | Exports the version tied to the newest revision. | A file without a revision fails. |
Naming and folders
Placeholders resolve when the job starts, so one profile or task names every STEP the same way:
(FileNameWithoutExtension)-(Revision)in(TopAssemblyFolder)\Exports\STEP: released files beside the project, namedBracket-B.step.(FileNameWithoutExtension)-(ConfigurationName)with Convert multiple configurations:Bracket-Default.step,Bracket-Machined.step.(VaultRootFolder)\Supplier Packages\($ProjectNumber)\(TargetExtension)in the task: astepsubfolder per project. The extension resolves itself, so don’t add a period after it.
Customize Location (Premium in the add-in, standard in the task) gives each format its own folder: enable the
steprow to override the main location for STEP only. Typical use: STEP to a supplier share, PDF to a released-drawings folder, from one task.
Tips and troubleshooting
- Publishing a large assembly’s parts in one run needs Premium; Community Edition stops at 5 references.
- Exclude
*Flat*or*Flat-Pattern*in the Configuration Filter so you don’t ship an unfolded sheet metal STEP. - Ticking PDF on a part exports the same-name drawing in the same folder, not the model. Use 3D PDF – MBD (
_3dpdf) for the model. - Can’t see the exported files? You need add and edit permission in the export location. The vault root is usually locked; target a subfolder such as
(VaultRootFolder)\Exports. - An assembly run that misses parts usually lacks local copies of the references; Get Latest first.
- STEP has no sub-options in PDMPublisher. Set SOLIDWORKS’ export options under
Tools > Options > Exportwhere the job runs.
Availability
Available in PDMPublisher for SOLIDWORKS (the add-in) and PDMPublisher for PDM Professional (the task).
Documentation and related features
- Run a Publish Job (PDMPublisher for SOLIDWORKS)
- File Formats option
- SOLIDWORKS part documents
- SOLIDWORKS assembly documents
- Extension-specific export locations
- Run as a SOLIDWORKS PDM task
- Convert SLDPRT to Parasolid
- Convert SLDPRT to IGES
- Convert SLDASM to STEP
Frequently asked questions
Can I convert all configurations of a SLDPRT to STEP at once?
Yes. Enable Convert multiple configurations and add (ConfigurationName) to the filename. The Configuration Filter can include PROD* or exclude *Flat*.
How do I export each body of a multi-body part to a separate STEP file?
Tick Split bodies. You get one STEP per body, body name appended, in the add-in and the task.
Is SLDPRT to STEP free in PDMPublisher?
The Community Edition of the add-in publishes STEP, PDF and DXF free, up to 5 references per run. The PDM task is licensed per vault with a 7-day trial.
Can a PDM workflow transition create the STEP file automatically?
Yes. Attach a PDMPublisher task with STEP ticked to the transition, say to Released, and enable Get latest revision only.