
Converting a sheet metal SLDPRT to a DXF flat pattern is what the laser, plasma or waterjet needs. It’s also the export most often done wrong: wrong scale, missing bend lines, a drawing DXF overwriting the flat pattern. PDMPublisher has a dedicated Export sheet metal parts to 1:1 flat pattern DXF option with its own Flat Pattern Settings, in both the add-in and the SOLIDWORKS PDM Professional task.
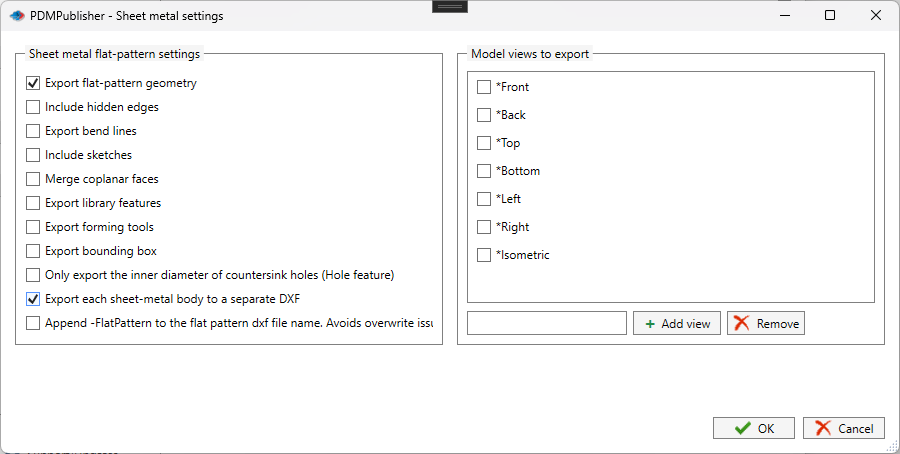
What you get
A 1:1 DXF of the unfolded part: profile, cutouts and, if you want, bend lines, sketches, forming tools and a bounding box. A nesting program or cutting machine reads it directly.
One DXF per sheet metal part; non-sheet-metal parts are skipped. Export each sheet-metal body to a separate DXF gives a multi-body part one per body. Append -FlatPattern to the flat pattern DXF file name gives Bracket-FlatPattern.dxf, so a drawing DXF of the same part can’t overwrite it. The dxf entry under File formats is a different thing: it converts drawings, and you don’t need it here.
The manual way, and why it doesn’t scale
Open the part, right-click the Flat-Pattern feature, choose Export to DXF/DWG, pick geometry and bend lines, confirm the alignment, save. Multi-body parts: once per body. New revision: all over again.
Fine for one bracket. For thirty parts heading to the laser it’s an afternoon, and the DXF set rarely matches the revision on the drawings.
Convert SLDPRT to DXF flat pattern with the add-in
- In SOLIDWORKS, open the sheet metal part (or an assembly containing them), references resolved.
- On the PDMPublisher tab, select Settings, then Publish.
- Set Export location, such as
\\server\laser\DXFor(TopAssemblyFolder)\Flat Patterns, no trailing backslash. - Set the Filename pattern, such as
(FileNameWithoutExtension)-(Revision). - At the bottom of the Export section, tick Export sheet metal parts to 1:1 flat pattern DXF. Leave DXF under File formats alone; that converts drawings.
- Select Flat Pattern Settings: geometry and bend lines to start. Add Include sketches for etch marks, Export forming tools for louvers and embosses, or Export bounding box for stock size.
- For multi-body parts, tick Export each sheet-metal body to a separate DXF. Split bodies doesn’t control flat pattern output.
- Tick Append -FlatPattern to the flat pattern DXF file name if the same job also converts drawings to DXF.
- Leave Model views to export cleared. A view such as
*Frontgives an annotation view, not an unfolded profile. - Select
PDMPublisher > Publish, confirm the review dialog, then check Publishing results per part.
DXF is a Community Edition format of the add-in (with PDF and STEP), limited to 5 references per run. Premium removes the limit and adds export locations by file format.
Automate it as a PDM task
PDMPublisher for PDM Professional uses the same option and the same Flat Pattern Settings, so the laser share gets a fresh DXF every time a part is released.
- In PDM Administration, right-click Tasks, select New Task, choose PDMPublisher and name it.
- On the Options page, set Export Location (
\\server\laser\DXFor(VaultRootFolder)\Flat Patterns\(Revision)) and the Filename pattern. - Tick Export sheet metal parts to 1:1 flat pattern DXF and set Flat Pattern Settings as in the add-in.
- For assemblies, set Template to a BOM layout with name, configuration and quantity columns and enable Export references to file formats individually.
- Pick Use this version of SOLIDWORKS and, for a release workflow, Get latest revision only.
- Attach the task to the release transition, leave it in the right-click menu, or run it from Scheduled Items.
Settings that matter for flat pattern DXF
| Setting | What it does | Tip |
|---|---|---|
| Export sheet metal parts to 1:1 flat pattern DXF | Flat pattern export for the sheet metal parts in the job. | Independent of DXF under File formats. |
| Export flat-pattern geometry | Profile, cutouts and visible flat pattern edges. | On by default; the basis of every cutting DXF. |
| Export bend lines | Bend lines from the SOLIDWORKS flat pattern. | For cutting-and-bending jobs. |
| Include hidden edges / Include sketches | Hidden edges, or visible sketch entities such as etch marks. | Hidden edges off for laser, plasma and waterjet. |
| Export forming tools / Export library features | Formed features and library feature geometry. | Also depends on the part’s sheet metal settings. |
| Export bounding box | The rectangle around the flat pattern. | For stock estimating and nesting. |
| Export each sheet-metal body to a separate DXF | One DXF per body of a multi-body part. | Split bodies isn’t needed. |
| Append -FlatPattern to the flat pattern DXF file name | Names the output Name-FlatPattern.dxf. | Keeps drawing and flat pattern DXFs from overwriting each other. |
Naming and folders
Placeholders resolve when the job starts, so one profile or task names and routes every DXF the same way:
(FileNameWithoutExtension)-(Revision)with the -FlatPattern suffix:Bracket-B-FlatPattern.dxf.($PartNumber)-(Revision): PDM part number instead of filename, for shops that key on part numbers.\\server\laser\DXF\(FileNameNumberRange)as the location: DXFs grouped by part-number range for nesting queues.
Customize Location (Premium in the add-in, standard in the task) sends
dxfto the laser share while PDF and STEP from the same job stay in the vault. Enable thedxfrow and it overrides the main Export location for that format only.
Tips and troubleshooting
- DXF under File formats converts drawings, not flat patterns. PDMPublisher warns: DXF is selected. This only converts drawings to DXF. To export flat patterns, enable the sheet metal flat pattern option below.
- Got a projected view instead of an unfolded profile? One of the Model views to export is ticked. Clear them all.
- Drawing DXF overwriting the flat pattern DXF? Enable Append -FlatPattern, or give the two outputs different folders.
- Multi-body part came out as one DXF? Enable Export each sheet-metal body to a separate DXF. The general Split bodies option doesn’t apply.
- Community Edition of the add-in does PDF, DXF and STEP only, up to 5 references per run; a large assembly’s parts need Premium.
- Can’t see the exported files? You need add and edit permission in the export location. The vault root is usually locked; target a subfolder like
(VaultRootFolder)\Exports.
Availability
Available in PDMPublisher for SOLIDWORKS (the add-in) and PDMPublisher for PDM Professional (the task).
Documentation and related features
- Run a Publish Job (PDMPublisher for SOLIDWORKS)
- Export Sheet Metal Parts to 1:1 Flat Pattern DXF
- Sheet metal publishing
- SOLIDWORKS part documents
- SOLIDWORKS drawing documents
- Extension-specific export locations
- Run as a SOLIDWORKS PDM task
- Convert SLDDRW to DXF
- Convert SLDASM sheet metal parts to DXF flat patterns
- Convert SLDPRT to STEP
Frequently asked questions
How do I export a SOLIDWORKS sheet metal flat pattern to DXF at 1:1 in batch?
Tick Export sheet metal parts to 1:1 flat pattern DXF, pick entities under Flat Pattern Settings, set the export location and Publish. Every sheet metal part in the job gets a 1:1 DXF.
Do I need to tick DXF under File formats for flat patterns?
No. That entry converts drawings. Flat patterns are controlled only by the sheet metal option at the bottom of the Export section.
Can I export each body of a multi-body sheet metal part to its own DXF?
Yes. Under Flat Pattern Settings, tick Export each sheet-metal body to a separate DXF. Split bodies isn’t needed.
How do I stop the drawing DXF from overwriting the flat pattern DXF?
Enable Append -FlatPattern to the flat pattern DXF file name, or use an extension-specific location so the two go to different folders.